
How to Draw Anime Eyes: 6 Steps, Angles, and Expressions
A beginner anime-eye method with original step diagrams, paired-eye alignment, three viewing angles, expression controls, troubleshooting and a printable practice sheet.

To draw anime eyes, build the structure before the decoration: sketch the upper lid, define the eye opening, tuck the iris under the upper lid, place the pupil, add one simple value pattern, then finish with highlights and the eyebrow. Draw both eyes through the same stage before polishing either one. That keeps the pair aligned and makes mistakes easier to correct.
You only need paper, a pencil, and an eraser. A digital app can make revisions faster, but it does not change the construction. Anime also contains many visual styles, so treat the proportions below as a starting system that you can stretch, simplify, or sharpen for your own character.
This guide includes original diagrams and a free practice sheet. If you want more beginner paths after the exercise, browse the anime guide library.
Draw one anime eye in six steps
Keep the first pass light. The goal is a readable eye, not a finished illustration. The XPPen beginner tutorial likewise begins with proportion and view angle before color or surface detail, while Wacom's eye guide recommends understanding the underlying structure even when the final design is highly simplified.
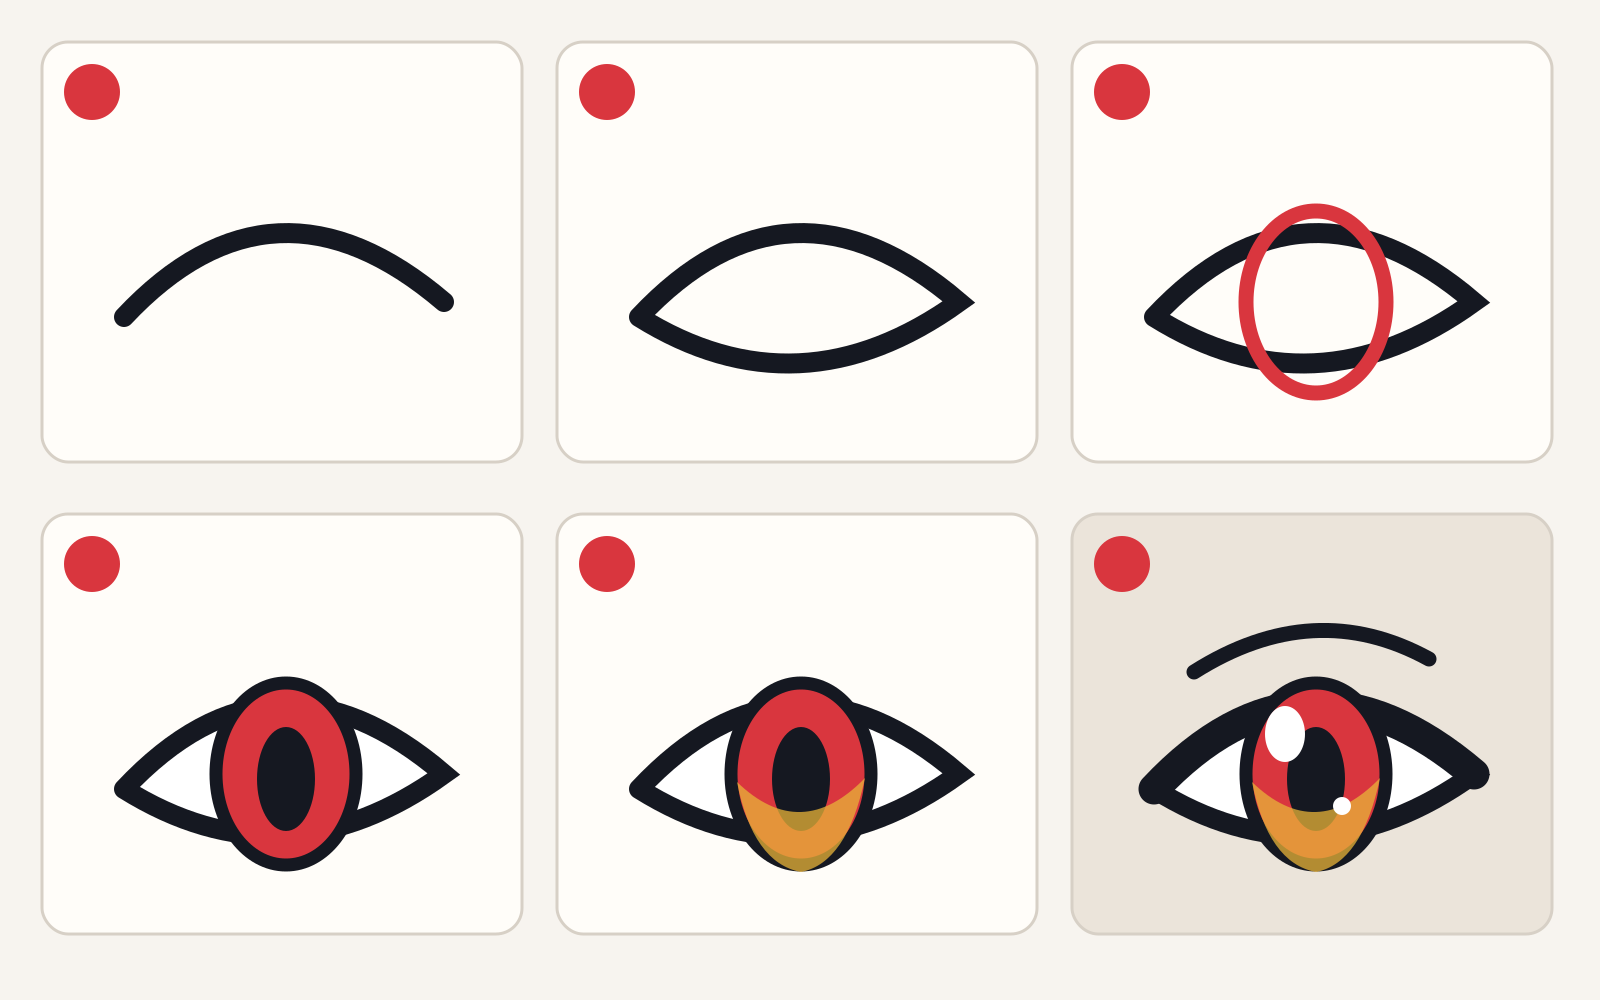
| Step | Draw this | Check before moving on | Fast correction |
|---|---|---|---|
| 1 | One confident curve for the upper lid | The inner and outer corners sit where you intended | Redraw the whole arc instead of repairing it with many short marks |
| 2 | A lighter lower-lid curve | The opening has a clear round, almond, or angular character | Move the lower lid before adding the iris |
| 3 | A circle or oval for the iris | The upper edge disappears slightly behind the upper lid | Raise the iris if it appears to float inside the white |
| 4 | A pupil inside the iris | Pupil and iris point in the same direction | Mark the gaze with a dot before widening the pupil |
| 5 | A dark upper value and lighter lower value | The eye still reads when you squint at the page | Simplify to two values if the iris looks noisy |
| 6 | Highlights, thicker upper line, and eyebrow | All highlights agree on one light direction | Remove extra sparkles before adding more |
Step 1: set the upper lid
The upper lid carries most of the eye's silhouette. A rounded arc reads softer; a flatter or more angular arc reads more severe. Use your shoulder and wrist for the curve instead of moving only your fingers. If the line misses, redraw it lightly. Repeatedly tracing the same uncertain mark produces a fuzzy edge that hides the shape you are trying to judge.
Step 2: choose the opening
Add the lower lid with less weight. It can meet the corners or stop short, depending on the style. Change one variable at a time: height, corner angle, or roundness. If you change all three together, you will not know which choice created the expression.
Step 3: place the iris under the lid
Draw the complete iris lightly, then erase or cover the part hidden by the upper lid. That overlap is the quickest way to make the eye feel seated inside the opening. A large visible iris creates a different design from a narrow one, but neither is a universal anime rule.
Step 4: aim the pupil
Place a small gaze dot first. Check where the character is looking, then build the pupil around that dot. When drawing a pair, both gaze dots must shift together. If one sits farther inward than the other, the character can look cross-eyed even when the lids match.
Step 5: establish the value pattern
Before color, divide the iris into a dark upper area and a lighter lower area. The Clip Studio Art Rocket eye tutorial demonstrates this in grayscale: the upper iris receives more shadow from the lid, while a lighter lower region adds contrast. This simple pattern works in pencil and gives digital color a clear foundation.
Step 6: add the finish
Thicken the upper lid, clean the corners, add the eyebrow, and place one main highlight plus an optional small secondary highlight. Keep the highlights on the same side in both eyes. A highlight is a lighting cue, so moving it randomly can flatten the form instead of making it glossy.
How to draw two matching anime eyes
The common trap is finishing the first eye and trying to copy it. By then you are comparing a polished object with a blank space, which makes every early line in the second eye feel wrong. Build a pair in parallel instead.
- Draw one horizontal eye line across the face.
- Mark all four corners before drawing either lid.
- Use one eye width as an adjustable starting gap, then change it for your character and head angle.
- Draw both upper lids.
- Draw both lower lids.
- Place both gaze dots, then both irises and pupils.
- Flip the page or canvas to diagnose the pair, then correct the original drawing by hand.
Measure landmarks rather than tracing a mirror copy. The eyes belong to the same face, but small differences can make the expression feel alive. What should match is the design logic: lid height, corner direction, iris scale, gaze, highlight direction, and eyebrow relationship.
On a front view, compare the inner corners against the nose center line. Compare the outer corners against the side planes of the face. If one eye looks higher, check the corner marks before redrawing the iris; the first broken landmark is usually the real cause.
Turn the eye with the head
An eye is not a sticker on a flat face. Imagine the lids wrapping around a ball. As the head turns, the visible opening compresses, the far eye narrows, and the iris becomes a thinner oval near profile. The Clip Studio multiple-angle guide teaches the same form-first idea across front, three-quarter, and profile views.
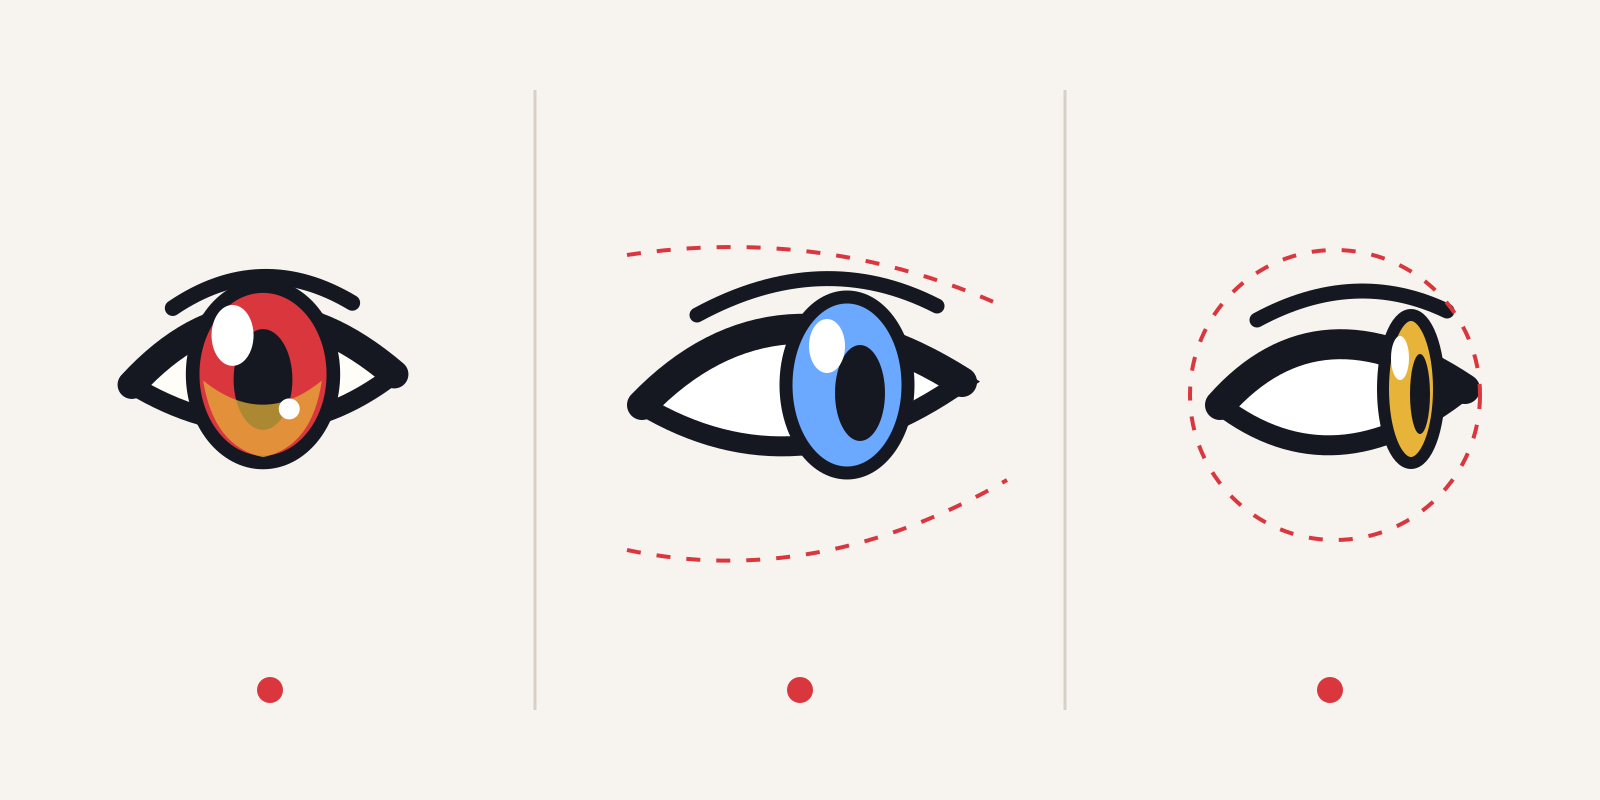
| View | Lid change | Iris change | Landmark to preserve |
|---|---|---|---|
| Front | Full designed width | Round or vertically stretched | Both gaze points share one direction |
| Three-quarter | Far side of the opening compresses | Oval shifts toward the turn | Near and far corners still wrap around the same eye line |
| Profile | Opening becomes a narrow leaf or wedge | Iris becomes a slim oval | Lids project around the eyeball instead of ending on a flat line |
For a three-quarter face, avoid drawing two front-view eyes at different sizes. Rotate the near and far eye through the same construction. The far eye is narrower because the surface turns away, not because it belongs to a different character.
For a profile, begin with a light eyeball circle. Place the visible iris at the front edge, wrap the lids around it, and erase the guide. This produces a side view with volume instead of a flat triangle.
Change expression with four controls
You do not need a new eye design for every emotion. Change four controls: eyebrow angle, upper-lid angle, opening height, and how much of the iris or white remains visible. Work from large changes to small ones.
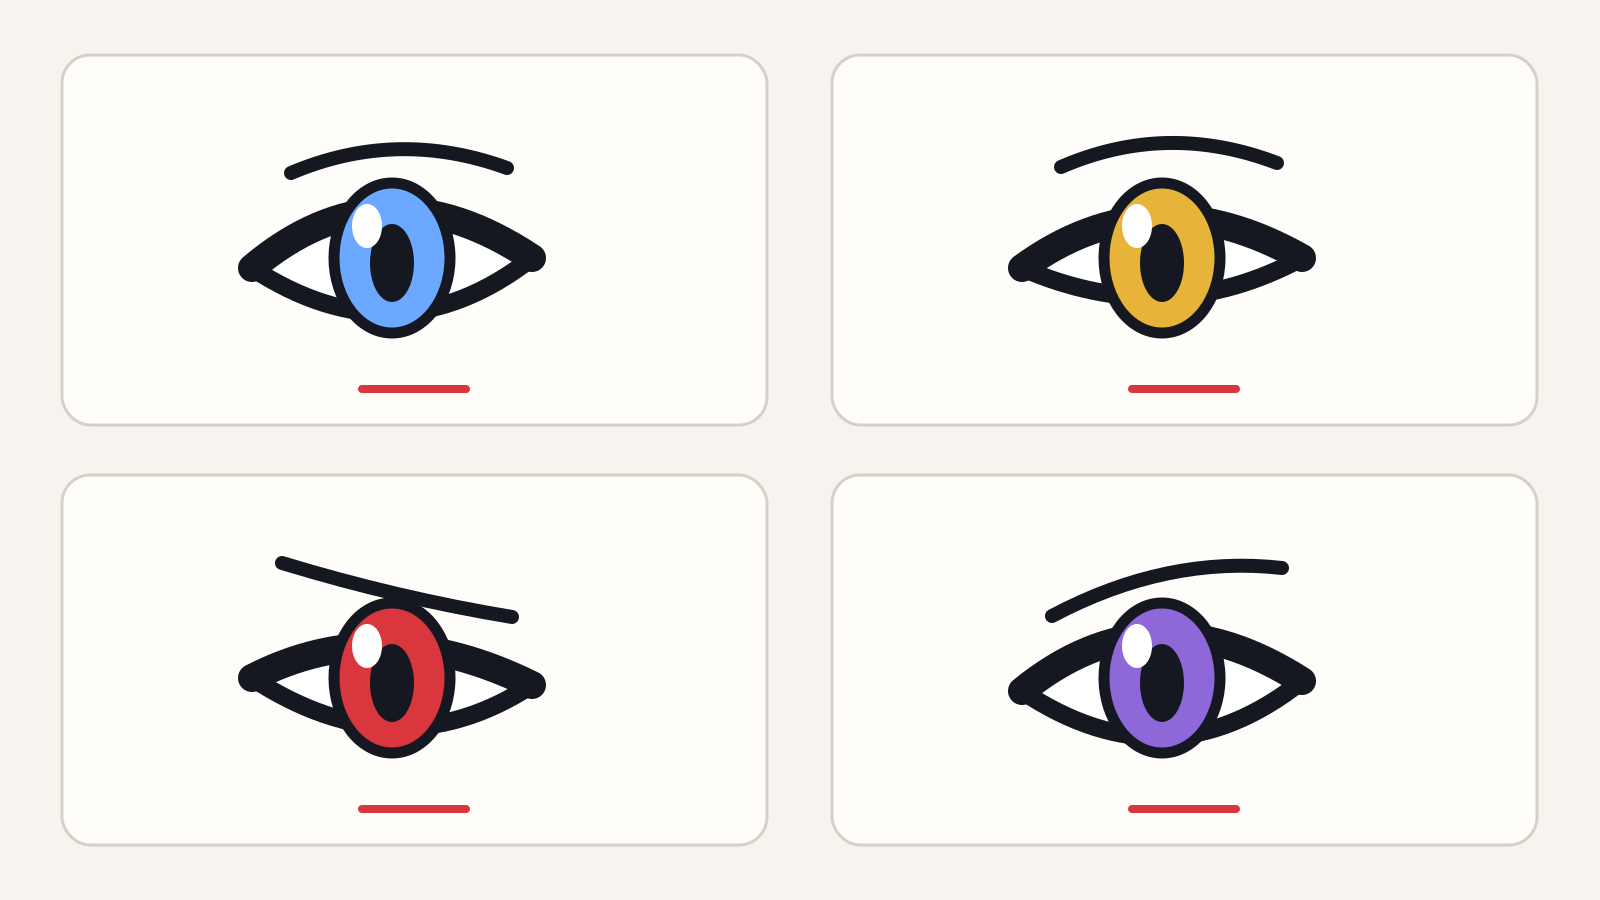
| Expression | Eyebrow | Upper lid | Iris and visible white |
|---|---|---|---|
| Neutral | Relaxed and separated from the lid | Balanced curve | Iris sits partly under the lid |
| Happy | Gently raised or arched | Lower lid can lift | Less white may show below the iris |
| Angry | Inner brow lowers | Upper lid angles down toward the center | More white can appear above or beside a smaller visible iris |
| Worried | Inner brow lifts | Upper lid softens or tilts upward | Opening can widen while the gaze stays focused |
| Surprised | Brows lift away from the eye | Opening becomes tall | More iris edge and surrounding white become visible |
Test the expression without color. If the grayscale silhouette does not communicate, more highlights will not rescue it. The Art Rocket source also emphasizes that shape, color, and expression need to work with the rest of the character rather than functioning as isolated decoration.
Anime is a medium with many lineages and visual systems, not one fixed eye template. The anime genres and terminology guide can help separate genre, demographic, format, and source labels before you use them as style shorthand.
Shade anime eyes on paper or digitally
For pencil, keep the sclera close to the paper value, darken the pupil and upper iris, and leave the highlight unshaded. Add a softer middle value below the upper shadow. Clean value separation matters more than filling the iris with many tiny lines.
For digital art, separate the work into a few layers: line art, flat color, shadow, and highlight. A clipping mask can keep the shadow inside the iris. Start in grayscale if your colors keep turning muddy; once the dark and light pattern reads, tinting it is easier.
Use one light source. If light comes from the upper left, place the strongest highlight consistently there and let the upper lid cast a darker band across the iris. A second small highlight can add sparkle, but it should support the same lighting story.
Color choice belongs to character design. Saturated color, a pale lower iris, and sharp white highlights create a luminous effect. Muted color and fewer reflections feel quieter. Preserve contrast between pupil, iris, and highlight so the gaze remains readable at thumbnail size.
Fix the mistakes that make anime eyes look wrong
Diagnose the earliest broken structure. Erasing the highlight will not fix a tilted eye line; redrawing the iris will not fix corners that sit at different heights.
| What you see | Likely cause | Correct this first |
|---|---|---|
| The pair looks uneven | Corner marks were placed after the first eye was finished | Return to one eye line and mark all corners together |
| The character looks cross-eyed | Gaze points do not shift as a pair | Reduce both pupils to dots and align the direction |
| The iris floats inside the white | No overlap with the upper lid | Raise the iris and hide its upper edge |
| The eye looks flat | Lids were drawn as a symbol instead of wrapping a ball | Sketch the eyeball and rebuild the curves around it |
| The eye looks noisy | Detail arrived before the value pattern | Return to one dark upper mass and one lighter lower mass |
| The expression feels unclear | Eyebrow and lid tell different stories | Choose the brow angle first, then echo it with the lid |
| The profile looks pasted on | Front-view width was preserved during the turn | Compress the opening and iris around the eyeball guide |
| The highlights look disconnected | Reflections use different light directions | Keep one main highlight direction across the pair |
Zoom out often. At small size, you see lid silhouette, gaze, and value balance without getting distracted by lashes or texture. You can also cover one eye and uncover it quickly; the change makes height and width differences easier to spot.
Use the printable practice sheet
Open the high-resolution anime-eye practice sheet, then print it or use it as a locked reference layer in a drawing app. The sheet leaves room for a three-pass drill:
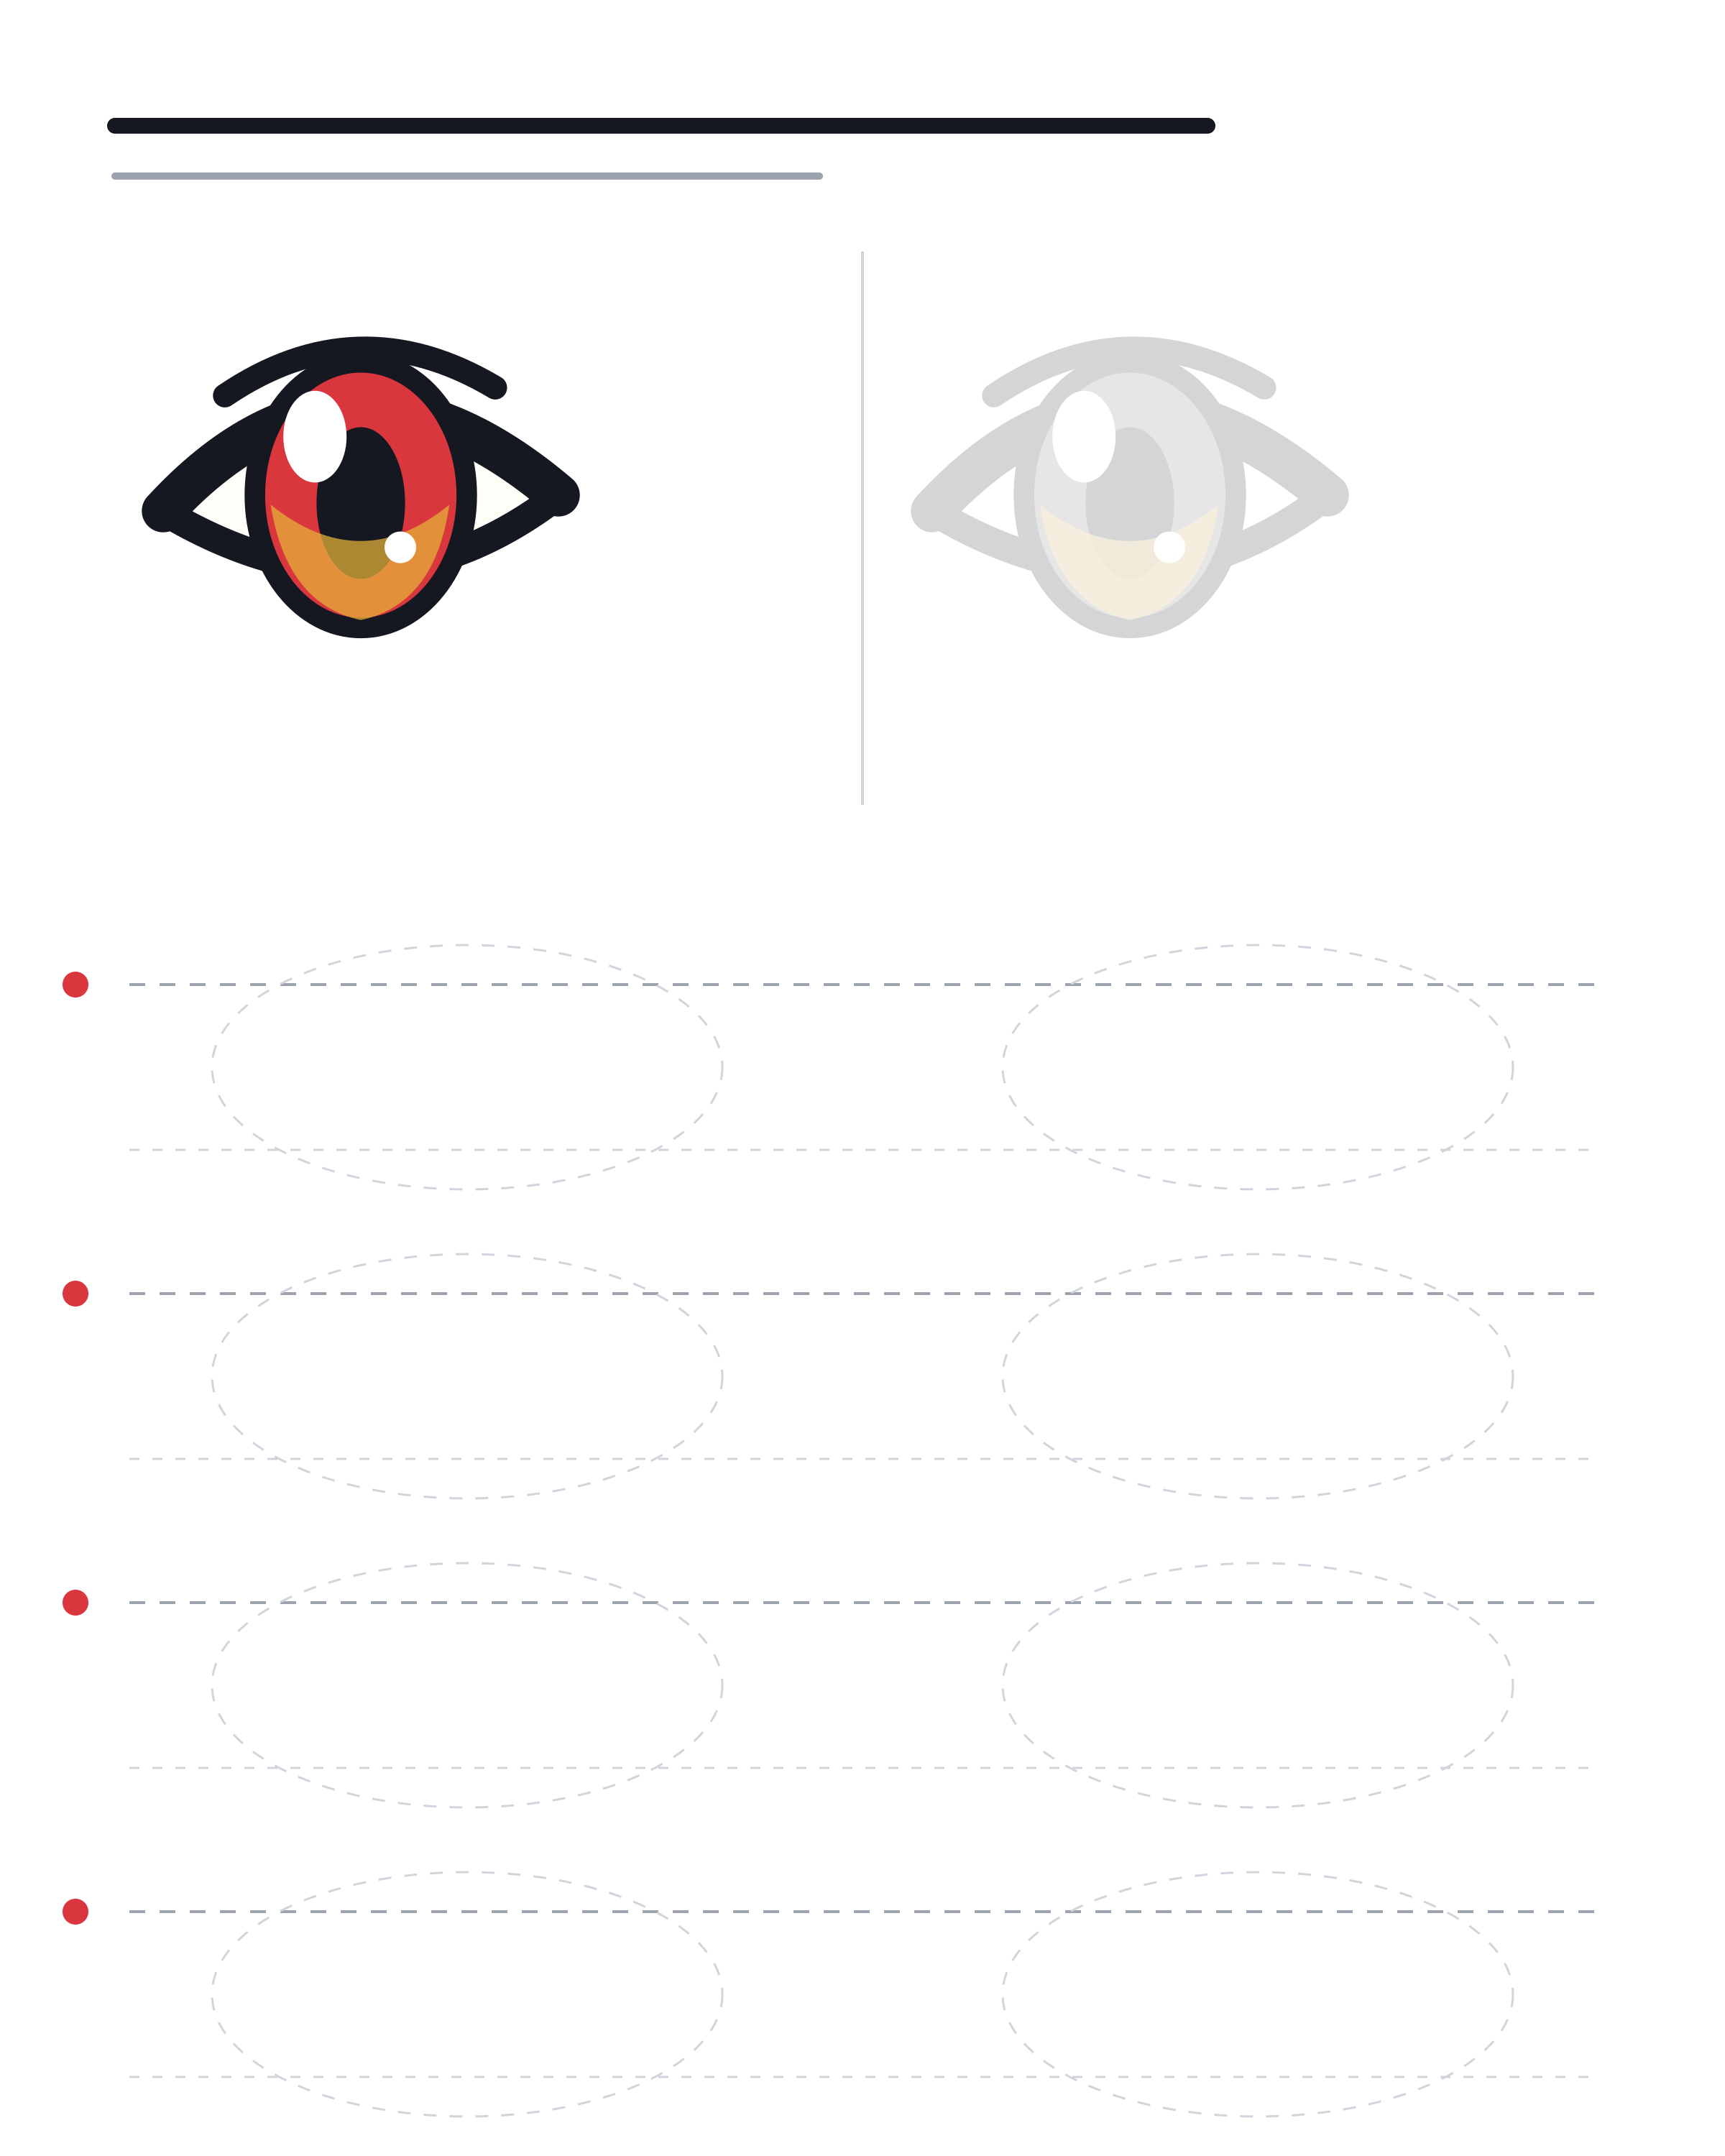
- Trace the structure once. Name each landmark as you draw it: upper lid, lower lid, iris overlap, pupil, value, highlight.
- Copy it once without tracing. Compare the four corners and gaze point before judging the details.
- Redraw it from memory. Change one design variable, such as lid angle or iris height, while preserving the construction.
Repeat the drill with front, three-quarter, and profile views. Short, deliberate repetitions are more useful than filling a page with the same unexamined symbol. Save each attempt instead of erasing every flaw; the sequence shows which landmark is improving and which one still drifts.
When you have a finished original, the anime room decor plan explains how to measure and display wall art without assuming one mounting method fits every surface. For another hands-on fan project, the anime convention cosplay guide moves from character reference to wearable planning.
Optional drawing tools
A regular pencil, eraser, and unlined paper are enough for every construction exercise above. If you are replacing worn supplies or moving into digital drawing, compare compatibility and return terms instead of buying for a pressure-level headline alone.
If you are choosing tools for somebody else, use the anime gift guide's buyer-confidence checks before spending. The useful question is whether the person draws on paper, a phone, a tablet, or a computer—not which device sounds most advanced.
Frequently Asked Questions
What is the easiest way to draw anime eyes?
Draw the upper lid, add a lighter lower lid, tuck a simple iris under the upper line, place the pupil, shade the upper iris, and finish with one consistent highlight. Keep the first attempt simple enough that you can judge the silhouette and gaze.
How do I make both anime eyes the same size?
Mark one eye line and all four corners before drawing either eye. Build both upper lids, then both lower lids, then both irises. Compare landmarks at the same stage instead of completing one eye and copying the result.
How far apart should anime eyes be?
One eye width is a useful starting measurement for a front-facing practice head, but it is not a rule. Change the gap for the character design and compress the far eye as the head turns. Preserve a shared eye line and gaze direction.
Why do my anime eyes look flat?
The lids may be sitting on the page as a flat symbol. Lightly draw the eyeball as a sphere, wrap the upper and lower lids around it, and tuck the iris under the upper lid. Consistent shadow and highlight direction will reinforce the form.
Should I draw anime eyes from real anatomy?
Learn the basic eyeball, lids, iris, pupil, and brow relationship, then simplify deliberately. Stylization does not require every anatomical detail, but a structural reference helps the eye rotate and express emotion without losing volume.
Do I need a drawing tablet?
No. Paper and pencil teach the same lid, iris, gaze, value, and perspective decisions. A tablet adds undo, layers, selections, and easy color changes; it does not replace the construction.
How do I find my own anime eye style?
Keep the construction stable and change one variable per study: opening shape, lid weight, iris size, highlight count, or value pattern. Compare the results at small size. Combine the choices that fit your character instead of copying one copyrighted character's design.
Written by WeebRai
Founder · Editor · Chief OtakuOne fan, 12+ years deep, 1,200+ series in. Every review, recap and ranking on PrimeTime Anime is written by WeebRai — checked against the actual episodes and manga, never recycled from press releases.